Arrays - Simple Image Editor


Arrays help us store and work with groups of data of the same type. The data is stored in consecutive memory spaces which can be accessed by using the name of the array with indexes or subscripts that indicate the position where the data is stored. Repetition structures provide us a simple way of accessing the data within an array. In today's laboratory experience, you will design and implement simple algorithms for image processing in order to practice the use of nested loops to manipulate bi-dimensional arrays.
Objectives
Practice the access and manipulation of data in an array.
Apply nested loops to implement simple image processing algorithms.
Use arithmetic expressions to transform colors in pixels.
Access pixels in an image and break them down into their red, blue, and green components.
Pre-Lab:
Before coming to the laboratory session you should have:
Acquired one or more files with a colored image in one of the following formats:
tiff, jpg, png.Reviewed the basic concepts related to repetition structures and nested loops.
Become familiar with the basic functions in
QImageto manipulate the pixels in the images.Studied the concepts and instructions for the laboratory session.
Taken the Pre-Lab quiz, available in Moodle.
Image Editing
In this laboratory experience, you will work with various concepts and basic skills of image editing. We have provided a simple graphical user interface that allows the user to load an image and invert it vertically and horizontally. Your task is to create and implement a function that converts a colored image into an image with gray tones, and another function that converts the colored image into a black and white image.
Pixels
The smallest element in an image is called a pixel. This unit consists of a single color. Since each color is a combination of tones for the primary colors red, green and blue, it is coded as an unsigned integer whose bytes represent the tones of red, green and blue of the pixel (Figure 1). This combination is called the color's RGB which is an acronym for "Red-Green-Blue". For example, a pure red pixel has an RGB representation of 0x00ff0000, while a white pixel has an RGB representation of 0x00FFFFFF (since the color white is a combination of tones of red, green and blue in all of their intensity).
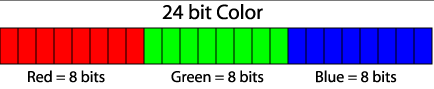
Figure 1. Bit distribution for the tones of red, green and blue in an RGB representation. Each tone can have values between 0x00 (the eight bits in 0) and (0xFF (the 8 bits in 1).
Qt uses the QRgb type of data to represent RGB values. Using certain functions that are described below, we can obtain the red, green, and blue components of the QRgb value of the pixel and manipulate the images.
Library
In today's laboratory experience you will use the QImage class. This class allows access to the data in the pixels of an image in order to manipulate it. The documentation for the QImage class can be found in http://doc.qt.io/qt-4.8/qimage.html.
The code provided in this project contains the following objects of the QImage class:
originalImage// contains the information of the original image that you will editeditedImage// will contain the edited image
The objects of the QImage class have the following methods that will be useful for today's laboratory experience:
width()// returns the integer value for the image's widthheight()// returns the integer value for the image's heightpixel(i, j)// returns theQRgbfor the pixel in position(i,j)setPixel(i,j, pixel)// modifies the value for the pixel in position(i,j)to the valueQRgbof pixel
The following functions are useful to work with data of type QRgb:
qRed(pixel)// returns the tone for the pixel's red colorqGreen(pixel)// returns the tone for the pixel's green colorqBlue(pixel)// returns the tone for the pixel's blue colorqRgb(int red, int green, int blue)// returns theQRgbpixel composed of the red, green and blue values received.
Examples:
QRgb myRgb = qRgb(0xff, 0x00, 0xff);: Assigns the value0xff00fftomyRgbwhich represents the color
Notice that the value
0xff00ffrepresents the values0xff,0x0, and0xff, that correspond to the red, green and blue components inmyRgb.If the following
4 x 4image of pixels represents the objectoriginalImage,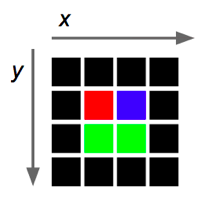
then
originalImage.pixel(2,1)returns thergbvalue that represents the color blue (0x0000ff).The following instruction assigns the color red to the pixel in position
(2,3)in the edited image:editedImage.setPixel(2,3,qRgb(0xff,0x00,0x00));.The following instruction assigns to
greenContentthe value of the green tone that is contained in the pixel(1,1)oforiginalImage:int greenContent = qGreen(originalImage.pixel(1,1));.The following program creates an object of the
QImageclass and prints the red, green and blue components of the pixel in the center of the image. The image used is the one specified within the parenthesis during the creation of the object, that is, the filechuck.png
#include <QImage>
#include <iostream>

using namespace std;
int main() {
    QImage myImage(“/Users/rarce/Downloads/chuck.png”);
    QRgb    centralPixel;

    centralPixel = myImage.pixel(myImage.width() / 2, myImage.height() / 2);

    cout    << hex;

    cout    << “The red, green and blue components of the middle pixel are: “
        << qRed(centralPixel) << “, “
        << qGreen(centralPixel) << “, “
        << qBlue(centralPixel) << endl;
    return 0;
}0xFF0000FF, what is the color of the pixel?0x00 for red and green, and maximum intensity (0xFF) for blue.
0xFF0000000xFFFFFFFF0xFF1111110xFFFF00FF0xFF000000, indicative of all the tones (red, green, blue) in its minimum intensity.
Laboratory Session:
In today's laboratory experience, you will design and implement simple image processing algorithms to practice the use of nested loops and the manipulation of bi-dimensional arrays.
Exercise 1 - Understand the Provided Code
Instructions
Load the project
SimpleImageEditorintoQtCreator. There are two ways to do this:- Using the virtual machine: Double click the file
SimpleImageEditor.prolocated in the folder/home/eip/labs/arrays-simpleimageeditorof your virtual machine. - Downloading the project’s folder from
Bitbucket: Use a terminal and write the commandgit clone http:/bitbucket.org/eip-uprrp/arrays-simpleimageeditorto download the folderarrays-simpleimageeditorfromBitbucket. Double click the fileSimpleImageEditor.prolocated in the folder that you downloaded to your computer.
- Using the virtual machine: Double click the file
The code that we provide creates the interface in Figure 2.
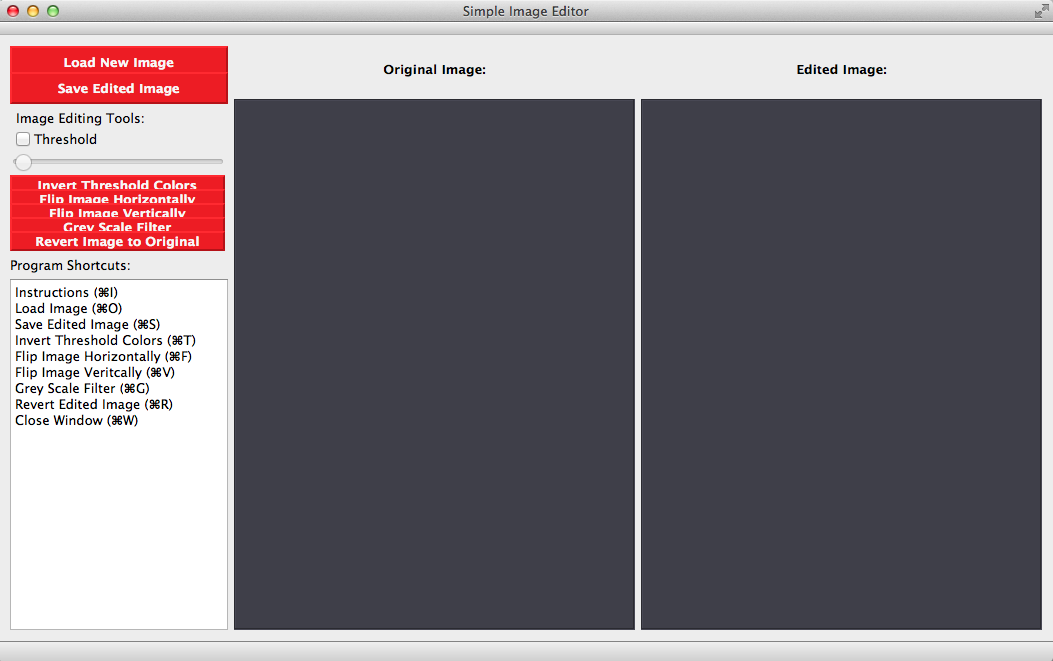
Figura 2. Interface del editor de imágenes.
You will be working with the
filter.cppfile. Study theHorizontalFlipfunction in thefilter.cppfile so you understand how it operates.In the following exercises, you will be mainly using the objects
originalImageandeditedImageof theQImageclass. What do you think is the purpose for thepixelvariable?The provided code already has the functionality of the buttons in the graphical user interface programmed. You do NOT have to change anything in this code, but we provide the following explanations so you can know a little about how the buttons work. In the
mainwindow.cppfile, thelblOriginalImageandlblEditedImageobjects correspond to the parts of the interface that identify the original image and the processed image. The buttonsbtnLoadImagebtnSaveImagebtnInvertThresholdbtnFlipImageHorizontallybtnFlipImageVerticallybtnGreyScaleFilterbtnRevertImageare connected to functions so when a button in the interface is pressed, a certain task is carried out. For example, when you press the
LoadImagebutton, a window will appear for you to select the file with the image you want to edit, which when read, the image is assigned tooriginalImage. The sliderthresholdSlidercan assume values between 0 and 255.
- Compile and run the program. Test the buttons for
Load New ImageandFlip Image Horizontallywith the images that you brought so you can validate if the buttons are working.
Exercise 2 - Convert a Colored Image to an Image with Gray Tones
Image grayscale is an operation that is used to convert a colored image to an image with tones of gray only. To make this conversion the following formula is used in each pixel:
gray = (red * 11 + green * 16 + blue * 5)/32 ; where red, green and blue are the values for the tones of the red, green and blue colors in the pixel of the original colored image, and gray will be the assigned color to the red, green, and blue colors in the pixel of the edited image. That is,
editedImage.setPixel( i, j, qRgb(gray, gray, gray) ).
Instructions
Using pseudocode, express the algorithm to convert a colored image to an image with gray tones only. The appendix in this document contains some advice about good techniques for writing pseudocode.
Complete the
GreyScalefunction in thefilter.cppfile to implement the grayscale algorithm. The function should produce a result similar to that in Figure 3, where the image on the left is the original image and the one on the right is the edited image.
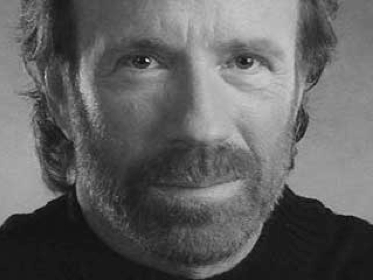
Figure 3. Original image and image after applying the
GreyScalefunction.
Exercise 3 - Convert a Colored Image to a Black and White Image ("Thresholding")
Thresholding is an operation that can be used to convert a colored image to an image in black and white. To make this conversion we must decide which colors of the original image will be converted to white pixels and which to black. One simple way of deciding this is to compute the average of the red, green and blue components of each pixel. If the average is smaller than the threshold value, then we change the pixel to black; if not, it's changed to white.
Instructions
Using pseudocode, express the thresholding algorithm. Assume that you will use the slider's value as the threshold.
In the program, if the
chkboxThresholdbox is marked, theapplyThresholdFilterfunction is invoked. TheapplyThresholdFilterfunction is also invoked each time that the value of the slider is changed.Complete the
ThresholdFilterfunction so it implements the threshold algorithm in the colored image using the slider's value as the threshold. If the implementation is correct, the image on the right should be the original image, but in black and white. The threshold value is a parameter of theThresholdFilterfunction. The code provided inmainwindow.hhas the constantsBLACKandWHITEdefined with their hexadecimal values; you can take advantage of this and use them in your code.The boolean parameter
invertColorwill betrueif the option to invert the colors has been selected. Write the code so that the white and black colors are inverted ifinvertColoristrue.Test the program with different images and different threshold values.

Figure 4. Original image and image after applying the
ThresholdFilterfunction.
Deliverables
Use "Deliverable" in Moodle to upload the filter.cpp file that contains the GreyScale and Threshold functions. Remember to use good programming techniques, include the names of the programmers involved, and document your program.
Appendix: Good Techniques for Writing Pseudocode
- Provide a description of the input and output data.
- Enumerate the steps.
- Use common repetition and decision structures:
if, else, for, while. - Indent the blocks of steps that are inside of a decision or repetition structure, "Python-style".
- You do not need to declare the types of variables, but you should initialize them. This is especially important for counters and accumulators.
- Remember that the purpose of pseudocode is so a human can understand it.
Example:
Input: n, a positive integer
Output: true if n is prime, false otherwise
---------------------------------------------------------
1. for i = 3 to n / 2
2.   if n % i == 0:
3.      return false
4. return true
References
[1] http://www.willamette.edu/~gorr/classes/GeneralGraphics/imageFormats/24bits.gif