Repetition Structures - Steganography

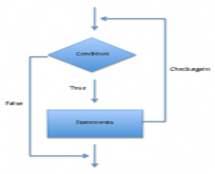
One of the advantages of using computer programs is that we can easily implement repetitive tasks. Structures such as the for, while, and do-while allow us to repeat a block of instructions as many times as needed. These structures are also referred to as repetition structures. In today's laboratory experience, you will complete a steganography application to practice the use of nested loops and the manipulation of bidimensional arrays.
Objectives:
Apply nested loops and decision structures to manipulate bidimensional arrays and extract messages hidden in images.
Use modular programming.
Use the binary representation of characters.
Pre-Lab:
Before coming to the laboratory session you should have:
Reviewed the basic concepts related to repetition structures, bidimensional arrays and decision structures.
Studied the concepts of the color composition of pixels in images.
Studied the binary representation of characters.
Reviewed the string manipulation methods.
Studied the concepts and instructions related to the laboratory session.
Taken the Pre-Lab quiz, available in Moodle.
Steganography
Steganography is the science of camouflaging the presence of hidden messages in legitimate carriers (seemingly harmless files). This science has been used by cybercriminals to inflict damage to computer systems and by (old style) terrorists to encode hidden messages transmitted through the internet. There is claim that Al-Qaeda may have used steganography to encode messages into images, and then transport them via e-mail, and possibly via USENET, to prepare and execute the September 11, 2001 terrorist attack.
Steganography has some lawful uses too [1]:
- A medical imaging laboratory can embed a patient's information into the images, thus preventing against fraud and/or patient misdiagnosis.
- We can use hidden information to identify the legitimate owner of a document or image. If the document is leaked, or distributed to unauthorized parties, one can trace it back to the rightful owner and perhaps discover which party broke the license distribution agreement.
In this laboratory experience, you will implement a simple algorithm to extract hidden messages from steganography images.
Image Editing
In this laboratory experience, you will recover secret messages that have been hidden in an image. To be able to carry out your task, you should understand some concepts related to images, be familiar with the methods of the QImage class in Qt, and using functions that works with data of type QRgb.
Pixels
The smallest element in an image is called pixel. This unit consists of a single color. Since each color is a combination of tones for the primary red, green and blue colors, it is coded as an unsigned integer whose bytes represent the tones of red, green and blue of the pixel (Figure 1). This combination is called the color's RGB which is an acronym for "Red-Green-Blue". For example, a pure red pixel has an RGB representation of 0x00ff0000, while a white pixel has an RGB representation of 0x00FFFFFF (since the color white is a combination of tones of red, green and blue in all of their intensity).
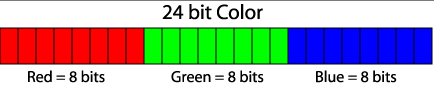
Figure 1. Bit distribution for the tones of red, green and blue in an RGB representation. Each tone can have values between 0x00 (the eight bits in 0) and 0xFF (the 8 bits in 1).
Qt uses the QRgb type to represent RGB values. Using the functions that are described below we can perform important operations to analyze images, such as obtaining the RGB of each pixel in an image, and to obtain the red, green and blue components of the QRgb value of the pixel.
Library
In today's laboratory experience, you will use the QImage class. This class allows you to access the data in the pixels of an image to manipulate it. The documentation for the QImage class can be found in http://doc.qt.io/qt-4.8/qimage.html.
The code provided in the file steganography.cpp contains the following objects of the QImage class:
origImage// contains the information of the original image where the message was hiddennewImage// will contain the image with the hidden message
The objects of the QImage class have the following methods that will be useful for today's laboratory experience:
width()// returns the positive integer value for the image's widthheight()// returns the positive integer value for the image's heightpixel(i, j)// returns theQRgbfor the pixel in position(i,j)
The following functions are useful to work with data of type QRgb:
qRed(pixel)// returns the tone for the pixel's red color, i.e. a value between (0x00 and 0xFF)qGreen(pixel)// returns the tone for the pixel's green color, i.e. a value between (0x00 and 0xFF)qBlue(pixel)// returns the tone for the pixel's blue color, i.e. a value between (0x00 and 0xFF)
Examples:
If the following
4 x 4image of pixels represents the objectorigImage,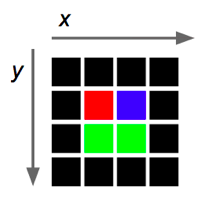
then
origImage.pixel(2,1)returns thergbvalue that represents the color blue (0x0000ff).The following instruction assigns to
greenContentthe value of the green tone that is contained in the pixel(1,1)oforigImage:int greenContent = qGreen(origImage.pixel(1,1));.The following program creates an object of class
QImageand prints the red, green and blue components of the pixel in the center of the image. The image used is the one specified within the parenthesis during the creation of the object, that is, the filechuck.png.
#include <QImage>
#include <iostream>

using namespace std;
int main() {
     QImage myImage(“/Users/rarce/Downloads/chuck.png”);
     QRgb centralPixel;

     centralPixel = myImage.pixel(myImage.width() / 2, myImage.height() / 2);

     cout << hex;

     cout << “The red, green and blue components of the middle pixel are: “
          << qRed(centralPixel) << “, “
          << qGreen(centralPixel) << “, “
          << qBlue(centralPixel) << endl;
     return 0;
} ---Embedding a message into an image
One of the simplest methods of hidding a message in an image is by encoding the message into the least significant bits of the image pixel's colors. This method effectively hides the message in the image because changing the least significant bit of a 8-bit color is barely noticeable by the human observer.
For example, Figure 2 shows two huge pixels, the one on the left has color 0xff0000 and the one on the right has color 0xfe0101. Recall that the most significant byte (i.e. the two leftmost hex digits) represents the intensity of the red color, the second byte represents the intensity of the green color, and the least significant byte represents the intensity of the blue color. In Figure 2, the least significant bits of the red, green and blue components of the two pixels are different, yet, they look the same color. The pixel on the right is the result of encoding the three bit message 011 into the original pixel's least significant bits (of each color). That is, encode the 0 in the least significant bit of the red component, encode the 1 in the least significant bit of the green component, and encode the 1 in the least significant bit of the blue component in the pixel.

Figure 2. The left square represents a pixel of color 0xff0000. The right square represents a pixel of color 0xfe0101.
Let's illustrate the embedding procedure of the word "Dog" into the following image:
Assume that each square is a pixel of the image.
The first step would be to obtain the ASCII representation of the message. The bits of the ASCII representation are the bits we will encode into the colors of the pixels. The ASCII representation of Dog is:
"Dog" = 01000100 01101111 01100111
The code 0100 0100 corresponds to the D, and so forth.
The encoding procedure it is easier to understand if we separate the bits into groups of three (one bit for each RGB component):
"Dog" = 010 001 000 110 111 101 100 111
Next, we start traversing the image pixel by pixel, embedding in each pixel three bits from the ASCII code (one bit in each pixel's color component). For instance, we would embed 010 in the first pixel, 001 in the second, and so forth.
We may do the following to embed each trio of bits b2, b1, b0:
Input:  p: a pixel
        b2,b1,b0: the trio of bits
Output: modifiedPixel: the pixel with the embedded trio
========================================================
1. r = red component of p
2. g = green component of p
3. b = blue component of p
4. clear the least significant bits of r,g,b
5. the red component of modifiedPixel will contain b2 substituted in the least significant bit of r
6. the green component of modifiedPixel will contain b1 substituted in the least significant bit of g
7. the blue component of modifiedPixel will contain b0 substituted in the least significant bit of b
For example, say that you are embedding the bit trio 011 into a pixel whose color code is 0xa5b6c7. The algorithm would compute as follows:
1. r = 0x10100101  // this is 0xa5
2. g = 0x10110110  // this is 0xb6
3. b = 0x11000111  // this is 0xc7
4. clear the least significant bits of r,g,b
   r becomes 0x10100100
   g becomes 0x10110110
   b becomes 0x11000110
5. the red component of the modifiedPixel will be 0x10100100 (that is, 0xa4)
6. the green component of the modifiedPixel will be 0x10110111 (that is 0xb7)
7. the blue component of the modifiedPixel will be 0x11000111 (that is 0xc7)

the modifiedPixel color code will be 0xa4b7c7
The following is the image after the word "Dog" was embedded.

Only the color of the first 8 pixels was modified, since the combined ASCII code for "Dog" was 24 bits long.
The following are the color codes for first eight pixels of the original and modified images:
| Original Image pixel | Bit trio | Modified image pixel |
|---|---|---|
| 0x99 99 99 | 010 | 0x98 99 98 |
| 0x00 00 00 | 001 | 0x00 00 01 |
| 0x00 00 00 | 000 | 0x00 00 00 |
| 0x00 00 00 | 110 | 0x01 01 00 |
| 0x00 00 00 | 111 | 0x01 01 01 |
| 0x00 00 00 | 101 | 0x01 00 01 |
| 0x00 00 00 | 100 | 0x01 00 00 |
| 0x00 00 00 | 111 | 0x01 01 01 |
Question: What message is hidden (using the least significant bit technique) in an image whose first 8 pixels are:
0x545554 0x666667 0x444544 0x333232 0xff0000 0x0100ff 0x00ff00 0x10aaba
Explain your answer.
110 in the red, green and blue components of a pixel with color 0x345678. Which would be the color value after we embed the three bits?
0x355778 , since:
• The red color will change from 0x34 to 0x35 after we turn on the least significant bit (0011 0100 --> 0011 0101)
• The green color will change from 0x56 to 0x57 after we turn on the least significant bit (0101 0110 --> 0101 0111)
• The blue color does not change because 0x78 (0111 1000) already has a 0 in the least significant bit.
Laboratory Session:
In today's laboratory experience, you will complete a steganography application to extract hidden messages from images.
Exercise 1 - Extract the Binary Message
Instructions
Load the project
SteganographyintoQtCreator. There are two ways to do this:- Using the virtual machine: Double click the file
Steganography.prolocated in the folder/home/eip/labs/repetitions-steganographyof your virtual machine. Downloading the project’s folder from
Bitbucket: Use a terminal and write the commandgit clone http:/bitbucket.org/eip-uprrp/repetitions-steganographyto download the folderrepetitions-steganographyfromBitbucket. Double click the fileSteganography.prolocated in the folder that you downloaded to your computer.The project contains the skeleton for an application to recover embedded messages from images. The messages that you will be recovering have been embedded using the least significant bit technique. The end of each message was encoded by using the ASCII character with binary code
00000000.
- Using the virtual machine: Double click the file
Compile and run the program. You should obtain an interface that looks similar to:
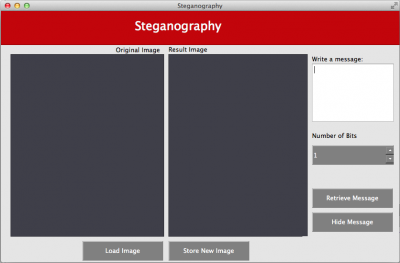
The button
Load Imagehas already been programmed to allow the user to load an image and display it. Your task is to program the functionality of the buttonRetrieve Messageso that it analyzes the image and extracts the hidden message. The hidden message should be displayed in theWrite a messagewindow.You will be working with the
steganography.cppfile. Complete theExtractMessagefunction that receives a steganography image so it extracts the digits of the binary message encoded in the image and stores them in a string. The function should invoke another functionbinaryStringToMessagethat converts the string from0's and1's in the message's characters and returns the hidden message.For example, if the first few pixels the image were these:
0x98 99 98 0x00 00 01 0x00 00 00 0x01 01 00 0x01 01 01 0x01 00 01 0x01 00 00 0x01 01 01 0xf0 ea 00 0x44 00 f0 0x00 aa 22 . . .,your
ExtractMessagefunction would extract the least significant bits of each colors component and construct thestring:"010001000110111101100111000000000..".Notice that your algorithm should have some mechanism for detecting if the last 8 character block were all
0. When this happens, the algorithm should stop reading the pixels.The string of binary digits should then be sent to another function
binaryStringToMessage(see Exercise 2) that interprets the0's and1's as the bits of ASCII characters. In the example above, the string"010001000110111101100111000000000"would be decoded to "Dog" (because01000100corresponds to 'D',01101111is 'o',01100111is 'g', and a00000000symbolizes the end of the string.)To implement the algorithm for extracting the message, you should understand how the message was encoded. If necessary, review the "Embedding a message into an image" section.
Exercise 2 - Interpreting the Message
Instructions
Complete the
binaryStringToMessagefunction that receives the string of0's and1's extracted from the image so it returns the hidden message. You can use thebinStringToCharfunction to convert substrings of 80's and1's in its corresponding character.Test your code using the following images:
pug.png, contains the message "Hello World !"uprTorre.png, contains the message "CCOM3033 - Steganography Lab Rules!!!"
Once you validate your program using the test images, use the program to analyze the following images.
gallito.pngpuppy.pngvacas.png
Deliverables
Use "Deliverable" in Moodle to upload the steganography.cpp file that contains the ExtractMessage and binaryStringToMessage functions. Remember to use good programming techniques, include the names of the programmers involved, and document your program.
References
[1] Rocha, Anderson, and Siome Goldenstein. "Steganography and steganalysis in digital multimedia: Hype or hallelujah?." Revista de Informática Teórica e Aplicada 15.1 (2008): 83-110.