Selection Structures - Car Scrolling Game
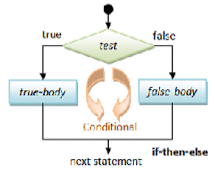
In almost every instance in which we want to solve a problem, we select between different options depending on whether certain conditions are met. Computer programs are built to solve problems, therefore they should have a structure that allows them to make decisions and select alternatives. In C++, selections are structured using if, else, else if or switch. Relational expressions and logical operators are common when handling selection structures. In this laboratory experience, you will practice the use of certain selection structures to complete the design of a car and an obstacle collision game application.
Objectives:
- Use relational expressions and select appropriate logical operators to make decisions.
- Apply selection structures.
Pre-Lab:
Before arriving at the laboratory you should have:
Reviewed the following concepts:
a. logical operators
b. if, else, else if, switch
Studied the concepts and instructions for the laboratory session.
Taken the Pre-Lab quiz, available in Moodle.
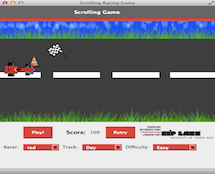
Car Scrolling Game
Collision games consist of maneuvering an object in order to dodge incoming objects to avoid possible collision. The collision can lower the player's score, or stop the game. Sometimes, colliding with certain objects may increase the player's score. In the game from today's laboratory experience, the object the player controls is a car, the objects that cause the game to stop are pines, holes, among others; and the objects that add points to the score are flags.
The controls for this game are simple: the up arrow moves the car up, and the down arrow moves the car down. During gameplay, the game simulates the movement of the car towards the right using a simple method: moving the background with its obstacles and flags towards the left while the car stays in the same place. The player can move the car up or down to dodge obstacles and to capture the flags. If the car collides with an obstacle, the game ends. The player can continue by pressing the Retry button.

What is the value of variable x at the end?
x at the end of this code is 9.
The first case (case 'A') matches the value of variable c and assigns 10 to the variable x. However, this case is not ended by a break so the program flow continues onto x--. Thus the final value is 9. The moral of this story is: remember to end each case of a switch with a break unless you are planning for some funky program behavior.
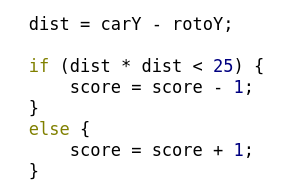
What values of carY and rotoY will increment the value of score
carY = 120, rotoY = 122 carY = 11, rotoY = 15 carY = 12, rotoY = 5 carY = 0, rotoY = 3 dist * dist < 25 false is carY = 12, rotoY = 5. All other pairs result in differences which, when squared, are less than 25.
Laboratory Session:
In this laboratory experience, you will practice the use of mathematical expressions and selection structures to implement the car's collision detection against obstacles and flags.
Your task is to complete the design of the game application.
Exercise 1 - Familiarize Yourself with the Pre-defined Functions
The first step in this laboratory experience is to familiarize yourself with the pre-defined functions (methods) in the code. You will invoke some of these functions in the code to detect the collisions.
Instructions
Load the project
CarScrollingGameintoQtCreator. There are two ways to do this:- Using the virtual machine: Double click the file
CarScrollingGame.prolocated in the folder/home/eip/labs/selections-carscrollinggameof your virtual machine. - Downloading the project’s folder from
Bitbucket: Use a terminal and write the commandgit clone http:/bitbucket.org/eip-uprrp/selections-carscrollinggameto download the folderselections-carscrollinggamefromBitbucket. Double click the fileCarScrollingGame.prolocated in the folder that you downloaded to your computer.
- Configure the project. The project consists of various files. You will only write code on the file
work.cpp. You should not change anything on the other files.
- Using the virtual machine: Double click the file
You are going to need a few methods defined in the following files to create your code.
car.hycar.cpp: contains the definition of the classCar, the methods of the class and their declarations.flag.hyflag.cpp: contains the definition of the classFlag, the methods of the class and their declarations.obtstacle.hyobstacle.cpp: contains the definition of the classObstacle, the methods of the class and their declarations.play.hyplay.cpp: contains the definition of the classPlay, the methods of the class and their declarations.Familiarize yourself with the methods in these files. Emphasize the following methods:
Car::getYCar(): Returns the {% math %}Y{% endmath %} coordinate of the car's position on the track.Flag::getXFlag(): Returns the {% math %}X{% endmath %} coordinate of the flag's position on the track.Flag::getYFlag(): Returns the {% math %}Y{% endmath %} coordinate of the flag's position on the track.Flag::hide(): Hides the flag.Obstacle::getXObstacle(): Returns the {% math %}X{% endmath %} coordinate of the obstacle's position on the track.Obstacle::getYObstacle(): Returns the {% math %}Y{% endmath %} coordinate of the obstacle's position on the track.Play::setScore(n): Receives an integer number and adds it to the game's total score.There isn't a
getXCar()method because the car does not move on the {% math %}X{% endmath %} axis.
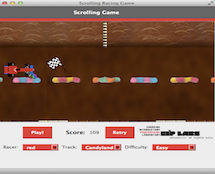
Exercise 2 - Complete the Function to Change the Game's Track.
In this exercise you will use the C++ condition structure called switch to change the attributes of the track. You will complete the setTrack method that can be found in the work.cpp file. This method changes the environment of the track depending on the value of track_type that is given as a parameter.
The method setTrack receives a value of type Track that can be:
play::DAY- for a day trackplay::NIGHT- for a night trackplay::BEACH- for a beach trackplay::CANDYLAND- for a candy track
The track's attributes that can be changed are:
- the image on the track using the function
setTrackPixmap() - the image of the obstacles using the function
setObstaclesPixmap()
The setTrackPixmap() function is already defined and receives a variable of type Track that can be one of the following: play::DAY, play::NIGHT, play::BEACH, play::CANDYLAND.
The setObstaclesPixmap() function is already defined and receives a variable of type string that can be one of the following: "hole", "cone", "it", "zombie", "spongebob", "patrick", "monster".
Instructions
To complete the setTrack() function:
Change the image on the track according to the
Trackvalue received.Change the image of the obstacles using the
switchselection structure such that the obstacles change according to the value received bysetTrack(). If the type of the track that is received is:play::DAY- the obstacles are of type "hole" or "cone"play::NIGHT- the obstacles are of type "it" or "zombie"play::BEACH- the obstacles are of type "spongebob" or "patrick"play::CANDYLAND- the obstacles are of type "monster"With the options that have two possible obstacles use
rand() % 2to randomly select between an obstacle or the other.
Exercise 3 - Complete the Function for Collision with Obstacles
In this exercise you will complete the obstacleCollision method that can be found in the work.cpp file. The function receives an object of the Obstacle class and another object of the Car class, and should detect if there is a collision or not between the car and the obstacle. The function returns true if there is a collision between the car and an obstacle, and false if there is no collision.
To detect the collision, the function should ask for the coordinates of the obstacle and the car's coordinate. Remember that the car does not move on the axis, since that coordinate is fixed and stored in a constant variable called CARX. The collision occurs if the obstacle has the same coordinate, and is a certain distance above and below the car's coordinate as shown in Figure 1. The range of the distance of the obstacle's center upwards and downwards is stored in the variable called OBSTACLERANGE.
If a collision is detected, the function returns true, and if not the function should return false.
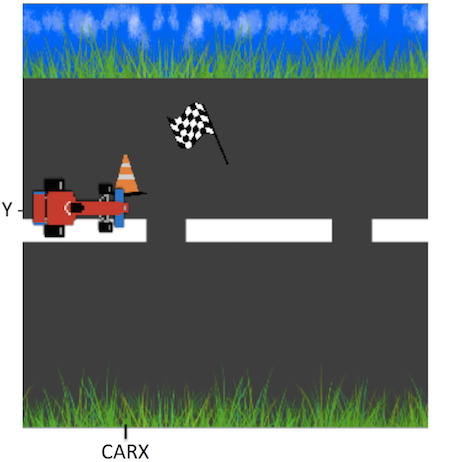
Figure 1. The image shows the coordinates that the obstacle should have for a collision to occur.
Exercise 4 - Complete the Function for Collision with Flags
In this exercise you will complete the flagCollision method that can be found in the work.cpp file. The function receives an object of the Obstacle class and another object of the Car class, and should detect if there is a collision or not between the car and the flag. This function is very similiar to the function in Exercise 3, except that the function does not return a value. The actions that occur when a collision is detected are done inside the function.
In this case if a collision is detected, the game's score should increase by 30 points using the setScore function, and the flags should be hidden using the flag.hide() function to create the illusion that the flag was picked up during the collision.
Deliverables
Use "Deliverable" in Moodle to upload the work.cpp file that contains the function calls and changes you made to the program. Remember to use good programming techniques, include the name of the programmers involved and document your program.
References
[1] Dave Feinberg, http://nifty.stanford.edu/2011/feinberg-generic-scrolling-game/